Placards, Paperwork and Airworthiness Inspection Complete!
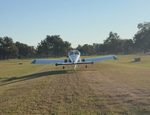
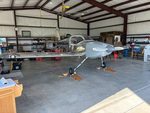
Spent time taking care of last-minute details prior to getting my Airworthiness Inspection. This included adding all required and nice-to-have placards such as exterior N-numbers, NO STEP on the flaps, fuel type and capacity at the fuel caps, baggage capacity, EXPERIMENTAL placard in the interior, and the stainless-steel aircraft data plate now riveted to the aft fuselage. I bought all my graphics from Aerographics in CO and was impressed with their service. I didn't want to spend much money on exterior markings since eventually the plane will be painted, and all those markings will be removed. I've wanted to add a fire extinguisher and found a tiny Halon aircraft one that fits in the palm of my hand. I attached it forward of the fuel selector on some unused real estate of which there is little in the cockpit. Other items include prepping separate maintenance logbooks for my airframe, engine and prop. Because my handwriting is atrocious, I used stick on address labels that I can neatly type log entries on, print out and then adhere on the logbook pages. Just looks neater and more professional that way. I also needed to research and document on a spreadsheet all FAA Airworthiness Directives and Service Bulletins for my airframe, engine and prop to make sure everything was complied with. And also note any recurring ones that warrant attention at each annual condition inspection. Fortunately, there were very few and they were minor in nature. Although not technically required for an amateur built aircraft it would be foolish to ignore them. I also had to basically undo all my previous work and remove the cowling and all interior and exterior access panels, seats and carpet to allow my DAR access. Finally, yesterday was the big day after coordinating all required FAA paperwork with my Designated Airworthiness Representative (DAR). Having never gone through this before and wanting to make a good first impression I cleaned and straightened up my hanger and made sure I had some drinks and snacks to offer him. Mel, my DAR, showed and the process couldn't have been easier or more pleasant. Mel is an RV guru well known in the RV community here in TX, having built several and conducting over 1000 airworthiness inspections. At 82 he's quite spry and thoroughly inspected the entire airplane, exterior and interior, using a checklist. He took a look at this build log and my Kit Assembly Manual while entertaining us with stories of his past decades of experiences. In the end, he found no discrepances and made suggestions on just a couple minor items. He was very complimentary on my workmanship which meant a lot given his experience. I started this journey nearly 6 years ago and there were plenty of times I wondered if I'd ever finish it. I haven't crossed the finish line yet but am getting close. Next week is transition flight training in IL to fill insurance squares. I need to also put my plane back together and address a few minor maintenance issues. Excessive brake drag is a nagging issue. My new titanium tie-down rings and jack pad from AeroGarage lets me safely jack the plane up to work on wheels and brakes. They seem very high quality. Hopefully the maiden flight very soon.
Author
This post is from Scott's RV-14 Build